Description
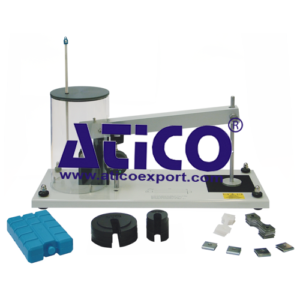
The Loading and Buckling of Struts allows tests on a full range of struts. It shows load and deflection characteristics and buckling loads for various strut lengths, cross-section and end conditions. It also allows studies of the effect of eccentric loading. An optional set of extra specimens allows extra tests to show students some of the more complicated problems found in strut design. The main part of the apparatus is a precision-engineered rigid aluminium base, with legs and levelling feet. At one end is a loading device which uses a screw to apply loads to the struts. The screw is in fixing blocks with bearings to give precise and easy load application. At the opposite end is the load measuring device. This is a precision mechanism that resists the bending moments produced by the struts as they deflect, and transmits the pure axial force to an electronic load cell. This gives an accurate measurement of buckling load. A digital load meter shows the load. Students may move the load-measuring device along the base to work with struts of different lengths and fixing conditions. A digital dial indicator fixed to a movable slide measures the deflected shapes of the struts. A scale shows the position of the indicator. The digital load meter and the digital dial indicator can connect to optional (Versatile Data Acquisition System). Holders are at both the loading and load measuring ends. They allow students to create any combination of ‘pinned’ or clamped end conditions for the strut under test. Supplied is a set of special end fittings for tests with various eccentricities to show the effect of eccentric loading. The equipment includes a lateral pull attachment for students to apply light biasing loads, or larger side loads, as needed.
Learning Outcomes
- An extensive range of experiments may be carried out with this apparatus, including:
- The normal breaking load of a specimen over a fixed time
- Relationship between breaking load and time for lead specimens
- Time extension curves to show the three phases of creep (primary, secondary and tertiary)
- The effect of temperature on the creep rate of specimens
- Creep recovery
Specifications
ATICO is committed to a programme of continuous improvement; hence we reserve the right to alter the design and product specification without prior notice.
Dimensions : 570 mm x 430 mm x 220 mm
Nett weight: 7.5 kg
Approximate packed volume and weight: 0.1 m3; 15 kg
Temprature : Displayed by laboratory-standard thermometer or thermocouple and VDAS®
Creep : Measured by digital indicator, with output for VDAS®
Specimens (supplied):
20 x CP1010 Lead to BS EN 12588:2006
20 x CP1020 Polypropylene
20 x CP1025 Nylon 66 unfi lled
Test weights (supplied):
3 x 500 g
2 x 200 g
1 x 100 g
Operating Conditions
- Operating environment: Laboratory
- Storage temperature range: –25°C to +55°C (when packed for transport)
- Operating temperature range: +5°C to +40°C
- Operating relative humidity range: 80% at temperatures < 31°C decreasing linearly to 50% at 40°C

